
What is GoLogin?
GoLogin is your go-to tool for managing multiple online accounts, especially when it comes to web automation and browser fingerprinting. It’s perfect for creating and managing all your profiles without getting detected or hitting any limits. With GoLogin, you can easily set up and organize different browser profiles, each with its own cookies, cache, and unique fingerprint. Whether you’re into web scraping, managing social media accounts, or handling any task that needs multiple profiles, GoLogin makes it all super simple and hassle-free.How to Integrate Oculus Proxies With GoLogin
Install and Open GoLogin
1. Download GoLogin from the official website.2. Follow the installation instructions and launch the application.3. Log in to your GoLogin account. If you don’t have one, create a new account.
Create a New Browser Profile
1. Click + Add profile on the GoLogin Dashboard.2. Enter a Profile Name and add any relevant Tags.
Configure Oculus Proxy Settings
1. Scroll to the Proxy section within the profile settings.2. Select Custom Proxy and enter the following details: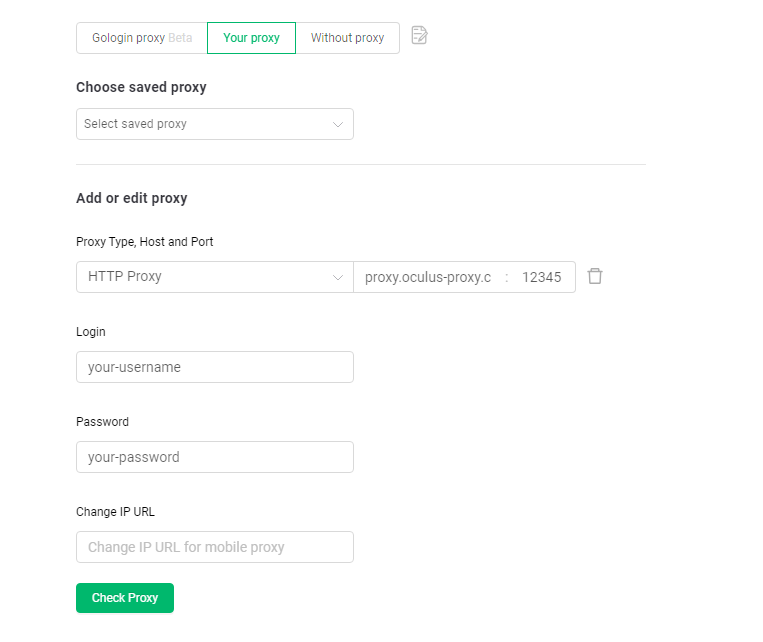
-
Proxy Type: Choose
HTTP,HTTPS, orSOCKS5. -
Host:
proxy.oculus-proxy.com - Port: Enter the port number from your Oculus Dashboard.
- Username: Your Oculus Proxy username.
- Password: Your Oculus Proxy password.
Save and Launch the Profile
1. Click Create Profile to save your settings.2. Locate the newly created profile on the GoLogin Dashboard.3. Click Run to launch the profile with your configured Oculus Proxy.
Verify Your Proxy Connection
1. Inside the GoLogin Browser, open a new tab.2. Visit httpbin.org/ip to check your current IP address.3. Ensure that the displayed IP matches your Oculus Proxy settings.